

- Key Takeaways
- Quick Checklist Before You Start
- Why This Matters for Enterprise Certificate Lifecycle Management
- Prerequisites Before You Begin
- Step-by-Step: Exporting the Certificate to PFX Format
- Step-by-Step: Importing and Binding the Certificate in IIS
- Prerequisite-to-Action Table
- Before-and-After: Manual vs. Automated Certificate Import Workflow
- Rollback Guidance
- Common Errors and Fixes
- Success Metrics to Track After Implementation
- Multi-Cloud and Hybrid PKI Environments
- Owner and Action Matrix by Team
- How Can Encryption Consulting Help?
- Conclusion
- Frequently Asked Questions
Quick answer: Importing a certificate into IIS Server Manager means combining the SSL/TLS certificate with its private key in .PFX format, then either importing that .PFX file through Server Certificates or binding an already-installed certificate to a site through Site Bindings. The process takes about 10 to 15 minutes once the certificate, prerequisites, and permissions are in place.
SSL/TLS certificates are what make it possible to host a website on IIS (Internet Information Services) without exposing every request in plain text. They encrypt the traffic between the server and the browser, which is why they are not optional for any IIS site handling PII, PHI, PCI data, or anything else an attacker could intercept through a man-in-the-middle attack.
The tricky part is rarely the concept. It is the mechanics of getting a certificate that was issued or managed elsewhere into a format IIS will actually accept, and then binding it correctly without breaking an existing site. This guide walks through both, prerequisite by prerequisite and screen by screen, and points out where most teams lose time or introduce a preventable outage.
Key Takeaways
- IIS Server Manager needs the certificate and private key together in .PFX format; a certificate without its private key cannot be imported.
- There are two supported paths: importing a .PFX file directly, or binding a certificate that already sits in the local machine’s certificate store.
- Most binding failures trace back to the application pool identity not having read access to the private key, not to the certificate itself.
- Public TLS certificates are on a shrinking validity schedule under CA/Browser Forum Ballot SC-081v3: 200 days from March 2026, 100 days from March 2027, and 47 days from March 2029, which makes manual import and binding a recurring, not one-time, task.
- A DigiCert Trust Pulse survey published in July 2025 found that 45 percent of enterprises had certificate-related downtime in the past year, and 37.5 percent of those incidents were caused by expired certificates, which is the exact failure mode manual IIS binding is prone to.
Quick Checklist Before You Start
- Certificate signing request (CSR) submitted and a valid certificate issued by a trusted certificate authority (CA).
- Certificate available in, or exportable to, .PFX format with its private key.
- IIS installed, running, and reachable with administrative access.
- Administrative rights to the server and to the Certificate Management Console (certlm.msc).
- Private key backed up securely before export, in case the working copy is lost or corrupted.
- A maintenance window identified, in case the site binding needs a rollback.
Why This Matters for Enterprise Certificate Lifecycle Management
Importing a certificate into IIS looks like a small, mechanical task until it is multiplied across an enterprise estate. According to DigiCert’s Trust Pulse Survey, published July 2, 2025, 45 percent of enterprises reported certificate-related downtime in the past year, and 37.5 percent of those incidents were specifically caused by expired certificates (DigiCert, July 2025). Manual import and binding, repeated server by server, is exactly the kind of process that produces that failure pattern: it depends on someone remembering to renew, export, import, and rebind before the old certificate lapses.
That risk is compounding because certificate lifespans are shrinking. Under CA/Browser Forum Ballot SC-081v3, endorsed by Sectigo and passed April 14, 2025, the maximum public TLS certificate validity drops from 398 days to 200 days in March 2026, 100 days in March 2027, and 47 days in March 2029 (Sectigo, April 2025). A manual import-and-bind process that was tolerable on a 398-day or even a 200-day cycle becomes a near-monthly operational burden at 47 days, and a near-monthly opportunity for a missed renewal to take down a production site. This is the core reason 47-day TLS certificate readiness and certificate automation have moved from a nice-to-have to a scheduling necessity for any team running IIS at scale.
Prerequisites Before You Begin
Confirm each of these before starting the import. Skipping a prerequisite is the most common reason the wizard fails partway through or the site binding does not take effect.
- CSR and issued certificate: Generate a certificate signing request (CSR) for the domain, including the common name, organization details, and location, and submit it to a certificate authority (CA) to obtain the signed certificate.
- Certificate in .PFX format: Confirm the certificate is available, or can be exported, as a .PFX file that bundles the certificate and its private key. This is the only format IIS Server Manager accepts for a direct import.
- Certificate staged in the personal store: Import the certificate into the local machine or personal certificate store before attempting to import it into IIS, if it is not already there.
- IIS installed and running: Confirm IIS is installed through Server Manager or the Add Roles and Features Wizard on Windows Server, and that the service is running and configured to host the target site.
- Administrative access: Confirm administrative privileges on the server and in the Certificate Management Console, since both the import and the binding steps require them.
- Private key backup: Back up the private key securely before exporting, since losing it makes the certificate unusable and forces a re-issuance.
If you manage certificates through a third-party Certificate Lifecycle Management (CLM) platform that cannot issue a .PFX file directly, this is the specific gap that makes the next section, exporting to PFX manually, necessary.
Step-by-Step: Exporting the Certificate to PFX Format
The .PFX format is what makes the certificate importable into IIS, because it packages the certificate and the private key together. These steps use the Certificate Management Console (certlm.msc).
- Open the Certificate Management Console: Run
certlm.msc, or go to File > Add/Remove Snap-in, select Certificates, click Add, choose My User Account, then click Finish and OK. - Locate the certificate: Navigate to Certificates – Current User > Personal > Certificates.
- Start the export: Right-click the certificate and select All Tasks > Export.
- Export the private key: In the Certificate Export Wizard, click Next, then select Yes, export the private key, and click Next again.
- Choose the .PFX format: Select the .PFX option and click Next.
- Set a password and save location: Specify a password to protect the file, click Next, choose where to save it, and click Finish.
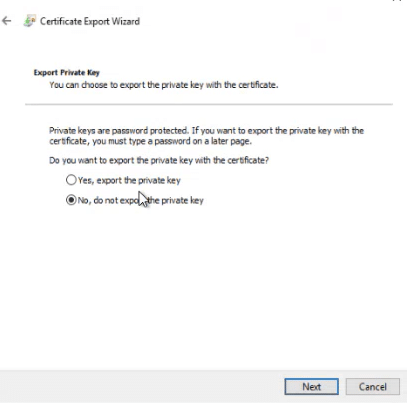
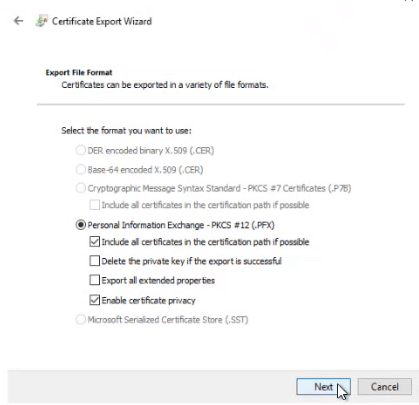
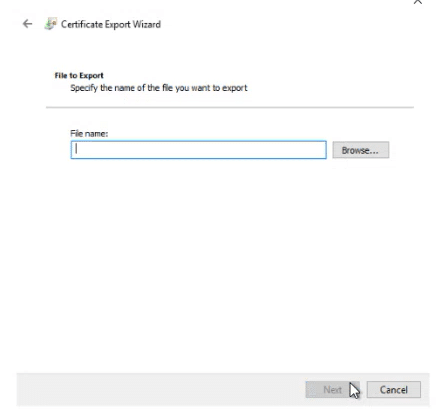
The certificate is now in .PFX format and ready to import into IIS Server Manager. There are two ways to complete the import: importing the .PFX file directly, or binding a certificate that is already in the local machine store. If PFX export is blocked by a certificate template restriction, skip to Method 2 below.
Step-by-Step: Importing and Binding the Certificate in IIS
Method 1: Import via a .PFX File
Step 1: Open IIS Manager and navigate to the Server Certificates section.
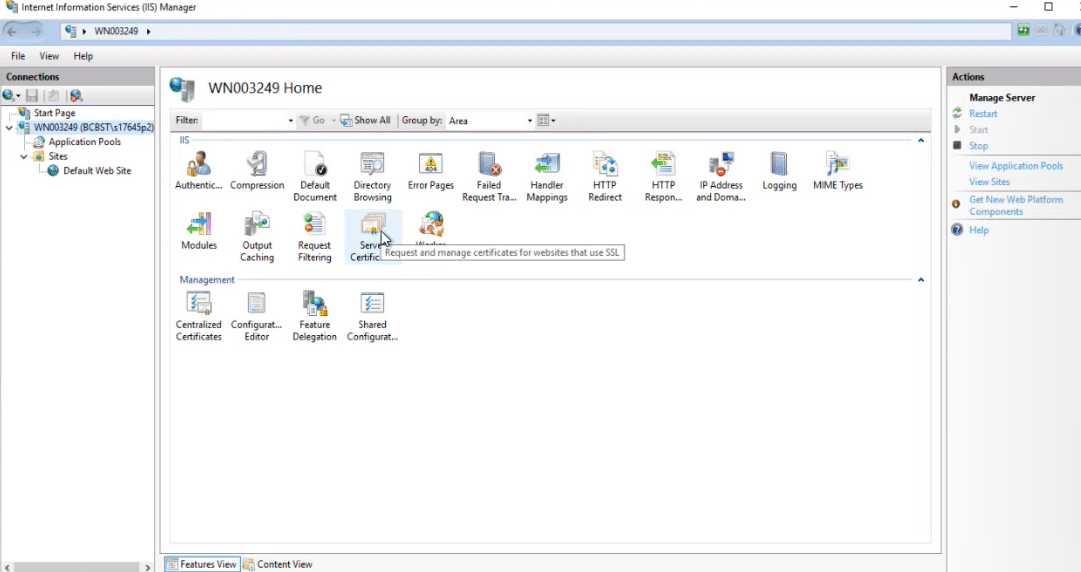
Step 2: Import the certificate. On the right-hand action pane, select Import, browse to the .PFX file, enter the password, and click OK.
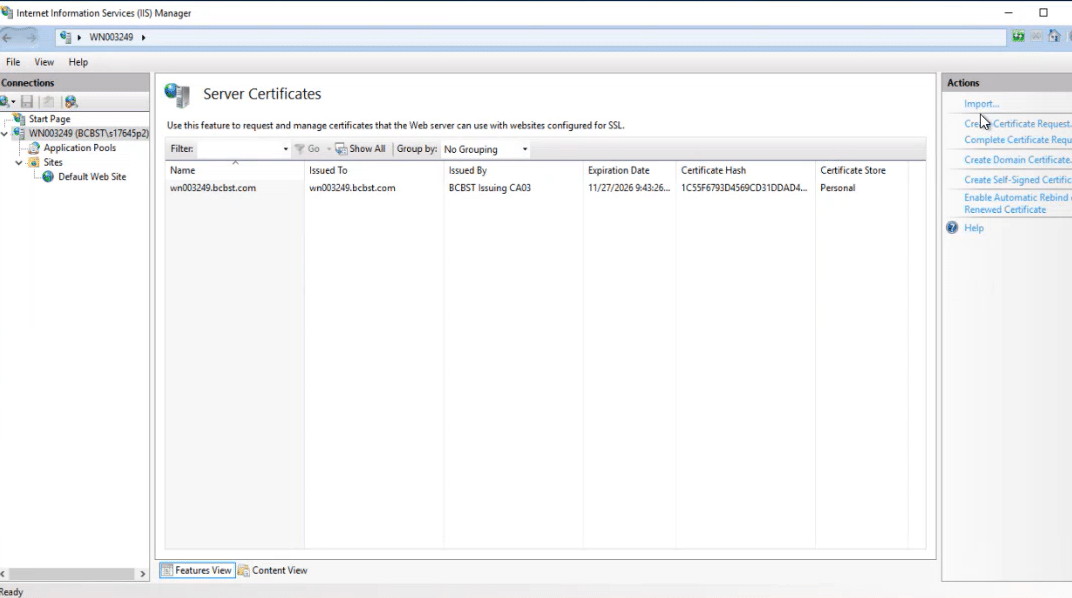
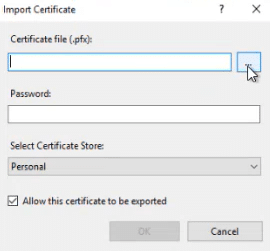
Once the import finishes, the certificate is available to IIS and ready to bind to a site.
Note: If exporting to .PFX fails because of a certificate template restriction, Method 2 lets you bind the certificate without needing a .PFX file at all.
Method 2: Bind an Existing Certificate from Certificate Bindings
Use this method if the certificate and its private key are already in the local machine store.
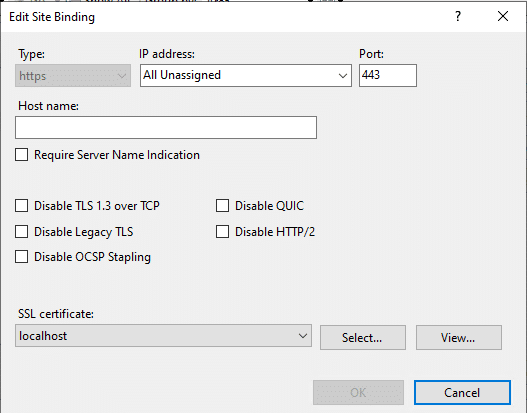
Step 1: Open site bindings. In IIS Manager, select the Default Web Site (or the target site) in the left pane, then select Bindings in the right-hand action pane.
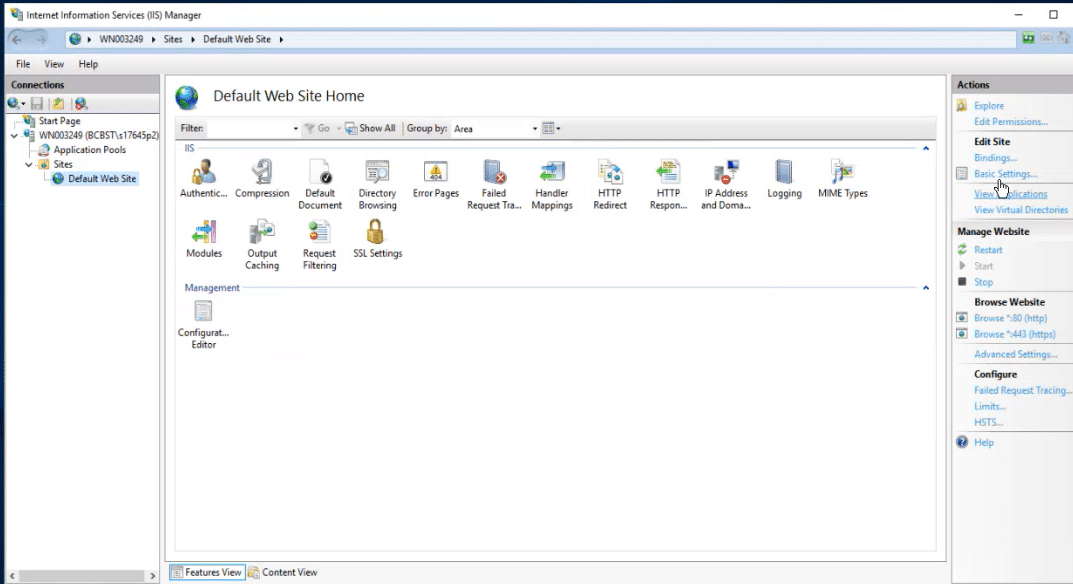
Step 2: Edit the port 443 binding. Locate and select the binding for port 443, then click Edit.
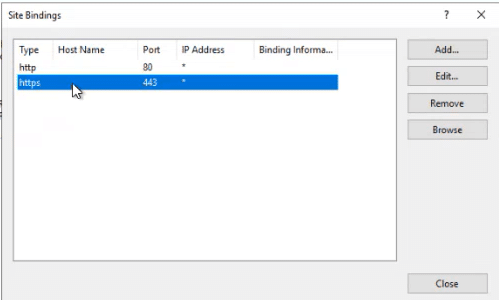
Step 3: Bind the certificate. Enter the hostname associated with the certificate, select the correct certificate from the dropdown, use View to confirm it is the right one, and click OK.
Troubleshooting Binding Errors
If editing the site binding throws an error, it is almost always a permissions issue on the private key rather than a problem with the certificate itself.
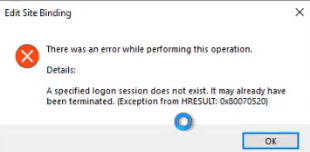
- Check the application pool identity: Confirm which account the site’s application pool runs under, and that it is the Network Service account or an equivalent identity with certificate access.
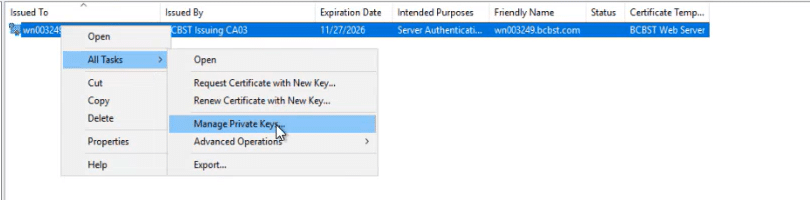
- Open the certificate store: Run
certlm.mscand locate the certificate under Personal > Certificates. - Manage private keys: Right-click the certificate, go to All Tasks, and select Manage Private Keys.
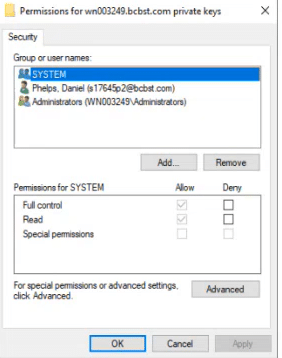
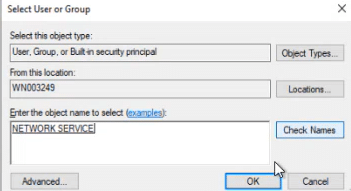
- Grant access: Click Add, type Network Service as the object name, click Check Names, and assign Read permission.
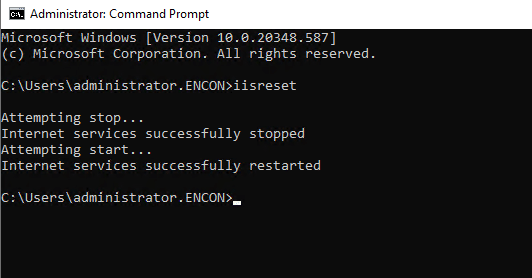
- Restart IIS: Run
iisresetfrom an elevated command prompt, then retry the binding.
You have successfully imported and bound the certificate. The site should now serve traffic over HTTPS using the new certificate.
Prerequisite-to-Action Table
Use this table to confirm ownership before starting the import, especially in environments where PKI, security, platform, and compliance responsibilities sit with different teams.
| Prerequisite | Owner | Action |
|---|---|---|
| Valid CSR and issued certificate | PKI team | Generate the CSR, submit it to the CA, and confirm the issued certificate matches the intended hostname. |
| Certificate in .PFX format | PKI team | Export the certificate and private key to .PFX, or confirm the CLM platform can deliver it in that format. |
| Administrative access to the server | Platform team | Grant time-boxed administrative access to the engineer performing the import. |
| Application pool identity permissions | Platform team | Confirm the application pool identity has read access to the private key before binding. |
| Change and rollback window | Security team | Approve a maintenance window and confirm a rollback plan exists before the binding change. |
| Audit evidence of the change | Compliance team | Record the certificate serial number, issuance date, and binding date for the certificate register. |
Before-and-After: Manual vs. Automated Certificate Import Workflow
The steps above work well for a single server or an occasional renewal. The comparison below shows why the same process becomes a liability at scale, particularly as validity windows shrink toward 47 days.
| Step | Manual workflow | Automated workflow (CertSecure Manager) |
|---|---|---|
| Certificate request | Engineer manually generates CSR and submits to CA | Enrollment triggered automatically via ACME, SCEP, or EST |
| Export to .PFX | Manual export through certlm.msc, per server | Delivered in the required format by the automation agent |
| Import and bind | Manual steps through IIS Manager, per site | IIS automation agent applies the binding directly |
| Renewal tracking | Relies on a person remembering the expiry date | Tracked centrally with automated renewal before expiry |
| Failure mode | Missed renewal causes an outage at expiry | Renewal and rebinding happen ahead of the deadline |
Rollback Guidance
If the new certificate causes binding errors, browser warnings, or breaks the site, roll back rather than continuing to troubleshoot in production.
- Reopen Site Bindings for the affected site and edit the port 443 binding.
- Select the previous, still-valid certificate from the dropdown and click OK.
- Run
iisresetto apply the change, then confirm the site loads correctly over HTTPS. - Do not delete the new certificate from the store until the root cause of the failure is confirmed, so it can be re-imported once fixed.
- Log the rollback and the reason in the change record for the compliance team.
Common Errors and Fixes
- “The parameter is incorrect” during export: Usually means the private key is marked non-exportable. Re-issue the certificate with the private key set to exportable, or use Method 2 to bind it without exporting.
- Certificate does not appear in the binding dropdown: The certificate is not in the local machine’s Personal store, or it was imported to the current user store instead. Re-import it to the machine store.
- “Cannot find the certificate key container” or similar access errors: The application pool identity lacks read access to the private key. Grant Read permission through Manage Private Keys, as covered in the troubleshooting steps above.
- Browser still shows the old certificate after binding: The site was not restarted, or a load balancer or CDN in front of it is caching the previous certificate. Run
iisresetand check any upstream termination point. - Hostname mismatch warning: The bound certificate’s common name or SAN entries do not match the site’s hostname. Confirm the CSR was generated for the correct domain before re-issuing.
Success Metrics to Track After Implementation
Track these after rollout to confirm the import and binding process is working and to build the case for automation if the numbers move the wrong way as validity periods shrink.
- Certificate-related downtime incidents per quarter
- Average time to import and bind a certificate, per server
- Number of certificates renewed within their validity window versus renewed late
- Volume of manual support tickets related to certificate binding or expiry
- Percentage of IIS servers with certificate lifecycle visible in a central inventory rather than tracked locally
Teams that move this workflow into CertSecure Manager typically report the automation reducing manual certificate tickets and cutting renewal and deployment time compared with the manual per-server process described above; ask your CertSecure Manager account team for the current quarter’s benchmark figures for your environment.
Multi-Cloud and Hybrid PKI Environments
The steps in this guide apply to a single Windows Server running IIS. In a multi-cloud or hybrid environment, that same certificate may need to be deployed consistently across on-premises IIS servers, cloud-hosted virtual machines, and load balancers from different vendors, each with its own import mechanism. Manually repeating these steps across every instance multiplies both the effort and the chance of a missed renewal.
This is where crypto agility and centralized certificate discovery matter beyond a single server. A current, accurate inventory of every certificate in use, on-premises and in the cloud, is what makes it possible to know which IIS instances need this update before an expiry causes an outage, rather than finding out after the fact. Building that inventory alongside PQC readiness planning also means the same discovery work supports the next migration, not just this one.
Owner and Action Matrix by Team
| Team | Responsibility | Action item |
|---|---|---|
| PKI team | Certificate issuance and format | Confirm every IIS-bound certificate can be delivered in .PFX format or automated through the CLM platform. |
| Security team | Risk and change control | Require a rollback plan and a maintenance window for every production binding change. |
| Platform team | Server and application pool configuration | Verify application pool identity permissions on the private key before every binding change. |
| Compliance team | Audit evidence and regulatory alignment | Maintain a certificate register showing issuance, binding, and expiry dates for every IIS-hosted service in regulatory scope. |
How Can Encryption Consulting Help?
CertSecure Manager, our CLM platform, includes automation agents for IIS, Apache, Tomcat, and load balancers like F5, so certificate renewal, delivery in the right format, and deployment, including binding to the hosted service, happen without a manual pass through the steps in this guide. That removes the two most common failure points covered above: a missed renewal and a private key permission that was never granted.
For teams also tracking their broader cryptographic estate, CBOM Secure builds and maintains a continuous inventory of certificates and cryptographic assets across on-premises and cloud environments, which is the foundation both for catching IIS certificates before they expire and for planning ahead for post-quantum migration. See how the two connect in From Discovery to Action: How a Cryptographic Bill of Materials Turns Inventory into Intelligence. Our Managed PKI services provide end-to-end support for certificate issuance, renewal, and troubleshooting when a manual fix like the one in this guide is not enough.
Conclusion
Importing an SSL/TLS certificate into IIS Server Manager comes down to two things: getting the certificate and private key into .PFX format, and binding them correctly with the right permissions in place. Both methods in this guide get you there, and the troubleshooting steps cover the permission issue that causes most binding failures. As certificate validity periods shrink toward 47 days, the bigger question is whether repeating this process manually, server by server, is still sustainable, or whether it is time to move the renewal and binding work into an automated certificate lifecycle platform.
Frequently Asked Questions
What is the main takeaway from A Guide on How to Import Certificates to the IIS Server Manager?
The certificate and its private key must be combined into .PFX format before IIS can use them, and they can then be applied either by importing the .PFX file directly through Server Certificates or by binding an already-installed certificate through Site Bindings. Most failures come from a permissions gap on the private key rather than a problem with the certificate itself.
Why does this matter for enterprise certificate lifecycle management?
A single import is a small task, but repeating it manually across hundreds of IIS servers, on a validity cycle that is shrinking toward 47 days, turns a routine step into a recurring source of outages. DigiCert’s July 2025 Trust Pulse Survey found 45 percent of enterprises had certificate-related downtime in the past year, with 37.5 percent of it caused by expired certificates.
What teams are responsible for acting on this guidance?
PKI teams own certificate issuance and format, security teams own change control and rollback approval, platform teams own server and application pool configuration, and compliance teams own the certificate register and audit evidence. The owner and action matrix above assigns each responsibility explicitly.
What risks increase if this topic is handled manually?
Manual, per-server import and binding increases the chance of a missed renewal, an inconsistent certificate across load-balanced instances, and undocumented changes that compliance teams cannot account for during an audit. As validity periods shrink, the same manual process has to run more often, which multiplies each of those risks.
How does automation reduce certificate outage risk?
Automated certificate lifecycle management tracks expiry centrally, renews certificates ahead of the deadline, and delivers and binds them to IIS, Apache, Tomcat, or load balancers through an agent rather than a manual per-server process, which removes the dependency on someone remembering to act before expiry.
What metrics should teams track after implementation?
Track certificate-related downtime incidents per quarter, average time to import and bind a certificate, the share of certificates renewed within their validity window, manual ticket volume tied to certificate issues, and the percentage of servers with certificate status visible in a central inventory.
How does this connect to 47-day TLS certificate readiness?
CA/Browser Forum Ballot SC-081v3 phases maximum public TLS certificate validity down to 200 days in March 2026, 100 days in March 2027, and 47 days in March 2029. Every IIS server that relies on the manual process in this guide will need that process repeated far more often, which is the operational case for moving to automated renewal and binding before the shorter windows take effect.
How should this be handled in multi-cloud or hybrid PKI environments?
The same certificate often needs to be deployed across on-premises IIS servers, cloud virtual machines, and load balancers from different vendors. A central, continuously updated certificate inventory is what makes it possible to know which instances still need the update, rather than discovering a gap after a certificate has already expired somewhere in the estate.
What prerequisites are needed before implementation?
A valid CSR and issued certificate, the certificate available or exportable in .PFX format, administrative access to the server and the Certificate Management Console, IIS installed and running, and a secure backup of the private key before export. The prerequisites section above covers each in detail.
What screenshots or configuration examples should be included?
The most useful screenshots are the Certificate Export Wizard steps for creating the .PFX file, the Server Certificates import screen, the Site Bindings edit dialog showing the hostname and certificate selection, and the Manage Private Keys permissions screen used to fix the most common binding error. This guide includes all of them in sequence.
- Key Takeaways
- Quick Checklist Before You Start
- Why This Matters for Enterprise Certificate Lifecycle Management
- Prerequisites Before You Begin
- Step-by-Step: Exporting the Certificate to PFX Format
- Step-by-Step: Importing and Binding the Certificate in IIS
- Prerequisite-to-Action Table
- Before-and-After: Manual vs. Automated Certificate Import Workflow
- Rollback Guidance
- Common Errors and Fixes
- Success Metrics to Track After Implementation
- Multi-Cloud and Hybrid PKI Environments
- Owner and Action Matrix by Team
- How Can Encryption Consulting Help?
- Conclusion
- Frequently Asked Questions