- Key Takeaways
- Executive Summary and Quick Checklist
- The Basics of Verification: How to Check SSL/TLS Certificates
- Decoding the Digital Trust: Understanding SSL/TLS & Certificates
- Public Key Infrastructure (PKI): The Backbone of Trust
- Understanding Cipher Suites and Protocols
- Acquiring and Managing TLS Certificates: From Generation to Renewal
- Generating Your Certificate Signing Request (CSR) and Private Key
- Implementing SSL/TLS on Your Web Servers: Linux and Windows
- Managing Certificate Lifecycles: A Step-by-Step Renewal and Automation Workflow
- Enforcing HTTPS: Crucial Redirection Strategies
- Advanced Security & Troubleshooting for SSL/TLS
- Enhancing Your SSL/TLS Security Posture
- Multi-Cloud and Hybrid PKI Certificate Management
- Owner and Action Matrix: What Each Team Should Do Next
- Our Take: What We'd Actually Recommend
- How Can Encryption Consulting Help?
- Conclusion
- Frequently Asked Questions About SSL/TLS Certificates
Have you ever wondered if that little padlock icon in your browser truly guarantees a website is secure? Or perhaps, as a website owner, you’ve asked yourself: “How do I know my SSL/TLS certificate is actually valid and doing its job protecting my visitors’ data?” The padlock and the https:// in the URL are useful first signals, but Chrome, Edge, and Firefox have all reworked that UI in the last two years, and the icon alone was never proof that a certificate is current, trusted, or matched to the right domain. This guide shows you how to check an SSL/TLS certificate directly in your browser, what these digital documents actually contain, and why the rules around them are tightening fast.
Whether you’re a curious everyday internet user, a website owner looking to enhance your site’s security, or a developer seeking practical implementation insights, this guide provides essential information and actionable steps for both Linux and Windows environments.
Quick answer: An SSL/TLS certificate is a digital file issued by a trusted Certificate Authority that binds a public key to a verified domain identity, enabling an encrypted, authenticated HTTPS connection. To check one, open your browser’s padlock or tune icon, confirm the Common Name matches your domain, verify the issuer, and check the validity dates.
Key Takeaways
- The padlock (or Chrome’s newer “tune” icon) only confirms encryption is active, not that the certificate is trustworthy or current. Always check the Common Name, Issuer, and Validity Period.
- SSL and TLS 1.0/1.1 are deprecated and cryptographically broken. Only TLS 1.2 and TLS 1.3 should be enabled on a production server.
- As of March 15, 2026, the CA/Browser Forum capped new publicly trusted TLS certificates at 200 days. That cap drops to 100 days in March 2027 and 47 days in March 2029, so manual renewal is becoming impractical.
- DV, OV, EV, wildcard, SAN, and self-signed certificates differ in validation depth and domain coverage. Pick based on the trust level and footprint you need, not just price.
- With renewal windows shrinking industry-wide, automated certificate lifecycle management (like EC’s CertSecure Manager) is now the practical way to avoid outages, not an optional upgrade.
- DigiCert’s July 2025 Trust Pulse Survey found that 45% of enterprises experienced certificate-related downtime in the past year, and 37.5% traced an outage directly to an expired certificate.
- Certificate lifecycle work spans four owners in most enterprises: the PKI team, the security team, the platform team, and the compliance team. Renewal automation only closes the outage gap if all four are coordinated.
Executive Summary and Quick Checklist
For a CISO or PKI lead skimming this between meetings, here is the shape of it: an SSL/TLS certificate is the mechanism behind the browser padlock, and validating one takes under a minute once you know where to look. The harder problem is scale. As public certificate lifespans compress from 200 days in March 2026 to 47 days by March 2029, the manual renewal habits built around annual certificates stop working. DigiCert’s July 2025 Trust Pulse Survey found that 45% of enterprises already experienced certificate-related downtime in the past year, and 37.5% traced an outage specifically to an expired certificate. This guide covers verification steps for individuals first, then a renewal and automation workflow for the teams who own the infrastructure.
Quick Checklist Before You Move On
- Confirm the padlock or tune icon shows a secure connection, then check the certificate’s Common Name, Issuer, and Validity Period.
- Verify only TLS 1.2 and TLS 1.3 are enabled on the server; SSL and TLS 1.0/1.1 should be disabled.
- Confirm HSTS is set with a defined max-age and includeSubDomains directive.
- Check that the private key file has restrictive permissions (chmod 400 on Linux) and sits outside any web-accessible directory.
- Confirm you know exactly how many certificates your organization manages and where each one is installed.
- Confirm a renewal automation path (ACME, SCEP, EST, or a certificate lifecycle management platform) is in place, not a calendar reminder.
- Confirm alerting fires on days-remaining thresholds, not only on the day a certificate expires.
The Basics of Verification: How to Check SSL/TLS Certificates
To effectively assess a website’s secure connection, you can employ various verification methods, from quick browser checks to in-depth command-line inspections.
Quick Checks in Your Web Browser
Start your assessment directly in your web browser, observing the visual cues and certificate details.
-
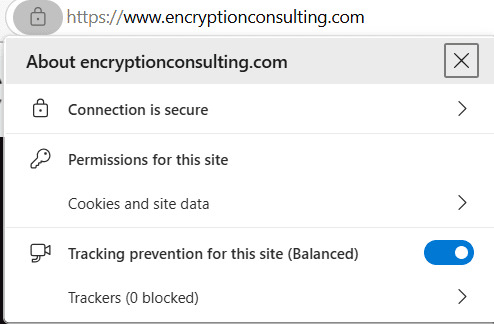
The Padlock Icon: This small symbol in the address bar is
your immediate indicator of a secure connection. A closed padlock signals
encryption, while a broken padlock (or a red line through https://) suggests
a security issue. Note that Chrome has replaced the padlock with a “tune”
(sliders) icon in recent versions; Firefox and Safari still show the
traditional padlock. Look to the immediate left of the address bar either way.
- Inspecting the URL: Always confirm the presence of https:// in the URL; the ‘s’ denotes a secure, encrypted connection.
-
Viewing Certificate Details (Step-by-Step): Most browsers
allow you to inspect the certificate in detail.
- Google Chrome: Padlock or “tune” icon → “Connection is secure” → “Certificate is valid.”
- Mozilla Firefox: Padlock → “Connection secure” → “More Information” → “View Certificate.”
- Microsoft Edge: Padlock or tune-style icon → “Connection is secure” → Certificate icon
- Safari: Padlock → “Show Certificate.”
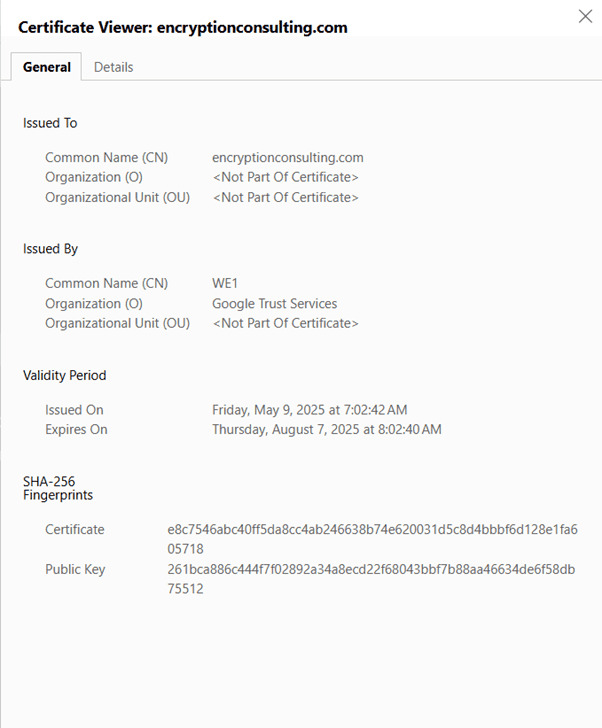
When viewing details, what to look for:
- Common Name (CN): Must precisely match the website’s domain (e.g., www.example.com).
- Issuer: The trusted Certificate Authority (CA) that issued the certificate.
- Validity Period: Ensure the certificate has not expired and is within its active dates.
Using Online SSL/TLS Checkers
For a deeper dive into a website’s security configuration, online SSL/TLS checkers such as DigiCert SSL Certificate Checker offer more comprehensive analysis than browser checks.
- Why use them: They probe the server’s setup to identify vulnerabilities or misconfigurations not visible in a browser.
- What they reveal: These checkers provide crucial details like the full certificate chain, supported SSL/TLS protocols (e.g., TLS 1.2/1.3), accepted cipher suites, and any known security vulnerabilities.
Command-Line Verification
For detailed diagnostics and troubleshooting, command-line tools such as OpenSSL provide granular control.
- Use
openssl s_client -connect yourdomain.com:443 -showcerts
To connect to the domain and display extensive certificate details. - Interpreting the output allows you to examine raw certificate data, the chain presented by the server, and negotiated cipher details.
Decoding the Digital Trust: Understanding SSL/TLS & Certificates
Understanding the mechanics behind secure web communication moves beyond basic definitions into the cryptographic and architectural principles that underpin online trust.
What Is SSL/TLS and HTTPS?
Secure online communication fundamentally relies on encryption, transforming data into an unreadable format to protect its confidentiality. At the heart of this security are the SSL and TLS protocols. While SSL (Secure Sockets Layer) is commonly used as a generic term, it is critical to note that TLS (Transport Layer Security) is its direct, modern, and more secure successor. All SSL versions are cryptographically broken and deprecated. TLS, in its current iterations (predominantly TLS 1.2 and TLS 1.3), incorporates stronger algorithms and improved handshake processes to mitigate vulnerabilities present in its predecessors. HTTPS (Hypertext Transfer Protocol Secure) represents the standard HTTP protocol layered over an SSL/TLS encrypted connection, ensuring all client-server data exchange is authenticated, encrypted, and integrity-protected.
| Feature | SSL | TLS |
|---|---|---|
| Security | Vulnerable to attacks (e.g., POODLE) | Stronger, more secure, protects against modern threats |
| Handshake Process | Slower, older algorithms | Faster and more secure; uses hashed handshake messages |
| Cipher Suites | Supports older ciphers like RC4 | Supports AES, ChaCha20, and AEAD ciphers (GCM, Poly1305) |
| Record Protocol | Uses MAC after encryption (less secure) | Uses HMAC (more secure and standardized) |
| Alert Messages | Generic and limited | Detailed and specific for better troubleshooting |
| Forward Secrecy | Not guaranteed | Enforced in TLS 1.3 (via ephemeral key exchange) |
| Performance | Slower due to inefficiencies | Faster; TLS 1.3 reduces handshake round-trips |
| Status | Obsolete and insecure | Recommended standard for secure communication |
Why Is It Crucial?
SSL/TLS and HTTPS are indispensable for online security, upholding three core pillars and offering significant strategic advantages.
- Data Confidentiality: Ensures sensitive information (e.g., credentials, payment details) transmitted between client and server remains encrypted and unintelligible to unauthorized interceptors, preventing eavesdropping and data breaches.
- Data Integrity: Guarantees that the data exchanged has not been tampered with or altered during transit. Cryptographic hashing and digital signatures detect any modification, immediately alerting both parties if data integrity is compromised.
- Authentication: Verifies the identity of the server to the client, assuring users they are connecting to the legitimate domain and not a malicious phishing site. This prevents Man-in-the-Middle (MitM) attacks by establishing trust in the server’s identity. Beyond security, HTTPS significantly builds user trust, as visual cues like the padlock reinforce security. Furthermore, Google explicitly uses HTTPS as a Search Engine Optimization (SEO) ranking signal, directly impacting website visibility and organic traffic.
The remaining gap is smaller than it used to be, but it hasn’t closed. As of January 2026, roughly 92.6% of the web’s top 100,000 sites served traffic over HTTPS by default, per W3Techs’ tracking, and Google has confirmed it will begin defaulting Chrome to HTTPS-only connections for all users starting with Chrome 154 in October 2026. That last unencrypted sliver is exactly where interception attacks concentrate, which is also why simply having a certificate isn’t the same as having a correctly configured one.
How Does SSL/TLS Work? The SSL/TLS Handshake
The SSL/TLS Handshake is a complex, multi-step cryptographic negotiation that establishes a secure channel before any data transfer.
- Client Hello: The browser initiates, sending its supported TLS protocol versions, preferred cipher suites, and a “client random” number.
- Server Hello: The server responds, selecting the mutually preferred TLS version and cipher suite, providing its TLS Certificate, and sending a “server random” number.
-
Certificate Verification: The browser validates the
server’s certificate by:
- Verifying the CA’s digital signature for authenticity.
- Building and validating the certificate’s Chain of Trust back to a trusted root CA.
- Confirming its validity period and non-revocation status.
- Ensuring the domain name in the certificate matches the accessed URL.
- Key Exchange: Using asymmetric cryptography (often Diffie-Hellman variants like ECDHE), the client and server securely establish a shared symmetric session key. The client encrypts a “pre-master secret” (or derives it directly) using the server’s public key; only the server’s private key can decrypt or complete the derivation. Both parties then independently compute the same session key from this secret and the random numbers.
- Encrypted Communication: With the session key established, all subsequent data transfer between client and server is encrypted and decrypted using this highly efficient symmetric key, ensuring confidentiality and integrity for the session duration.
Public Key Infrastructure (PKI): The Backbone of Trust
PKI is the architectural framework underpinning digital trust, built upon the asymmetric relationship between cryptographic keys. Each entity possesses a private key (kept secret) and a corresponding public key (freely distributed). The public key encrypts data readable only by the private key, and the private key digitally signs data verifiable by the public key.
- Digital Certificates: These electronic documents cryptographically bind an entity’s public key to its verified identity (e.g., domain name, organization). They serve as robust digital identity documents, issued and signed by a trusted third party.
- Certificate Authorities: CAs are globally trusted organizations responsible for issuing, managing, and revoking certificates. They rigorously verify the identity of certificate applicants (e.g., domain control, organizational vetting) before signing and issuing certificates, acting as anchors of trust.
- The Chain of Trust: PKI’s hierarchy consists of self-signed Root CAs (pre-installed in browsers/OS), which then sign Intermediate CAs. Intermediate CAs, in turn, sign end-entity (server) certificates. This chain allows browsers to verify the authenticity of any certificate by tracing its signature path back to a trusted root.
- Digital Signatures: CAs sign issued certificates using their private keys. When a browser receives a certificate, it uses the CA’s public key (from the chain) to verify this digital signature, ensuring the certificate’s integrity and confirming it was legitimately issued by that trusted CA.
Understanding Cipher Suites and Protocols
The cryptographic strength of an SSL/TLS connection is determined by the specific cipher suite and protocols negotiated.
-
Cipher Suites: A cipher suite is a collection of cryptographic algorithms used for a secure connection, typically specifying:
- Key Exchange Algorithm: (e.g., ECDHE, DHE)
- Authentication Algorithm: (e.g., ECDSA, RSA)
- Encryption Algorithm: For bulk data (e.g., AES-256 GCM, ChaCha20-Poly1305)
- Hashing Algorithm: For integrity (e.g., SHA-256, SHA-384)
Configuring servers to prioritize robust, modern cipher suites is critical to prevent the exploitation of weaker cryptographic methods.
- The Importance of PFS: PFS is a crucial security property that ensures the compromise of a server’s long-term private key does not compromise the secrecy of past session keys and, consequently, previously recorded encrypted communications. This is achieved through ephemeral key exchange methods (e.g., ECDHE, or Elliptic Curve Diffie-Hellman Ephemeral), where a unique, temporary session key is generated for each individual connection. This ephemeral key is never transmitted or persistently stored and cannot be derived from the server’s long-term private key. Even if an attacker records encrypted traffic and later steals the server’s private key, they cannot use it to decrypt the recorded sessions, providing retrospective data confidentiality and significantly enhancing overall security.
The mix of authentication algorithms in use is shifting too. Cloudflare’s Radar report for Q2 2026 found that ECDSA-signed certificates accounted for 50.3% of new certificates logged in Certificate Transparency that quarter, up from about 26.5% a year earlier, as more CAs and site operators move away from RSA for its larger key sizes and slower handshakes.
Acquiring and Managing TLS Certificates: From Generation to Renewal
Obtaining and maintaining TLS certificates for your web properties involves understanding various certificate types and the critical processes of key generation and lifecycle management.
Exploring Various Types of SSL/TLS Certificates
TLS certificates are categorized primarily by their validation intensity and domain coverage, each offering distinct levels of identity assurance and utility.
Domain Validated (DV) Certificates verify only domain control, typically via DNS record or email. These certificates provide essential encryption but no organizational identity proof to users. They are ideal for personal blogs, internal tools, or non-commercial sites, with services like Let’s Encrypt being a popular example.
Organization Validated (OV) Certificates extend beyond DV by verifying the legal existence and identity of the organization applying for the certificate. This offers higher trust by confirming organizational authenticity, which is visible in the certificate details. OV certificates are suitable for business websites, intranets, and e-commerce platforms requiring a layer of verified identity.
Extended Validation (EV) Certificates represent the most stringent validation level, involving comprehensive verification of the applicant’s legal, operational, and physical existence. This provides the highest level of user trust, historically indicated by displaying the organization’s name prominently in the browser address bar (though this visual cue is less common now). EV certificates are essential for large enterprises, financial institutions, and major e-commerce sites where maximum trust signaling is paramount.
Wildcard Certificates are designed to secure a main domain and all its direct subdomains (e.g., *.example.com covers blog.example.com and shop.example.com). Their primary benefit is streamlining certificate management and reducing costs for environments with numerous subdomains. Wildcard certificates, while convenient for securing all subdomains (e.g., *.example.com), pose risks such as a single point of failure: if the private key is compromised, all subdomains are vulnerable, along with challenges in key management, revocation impact, limited auditability, and increased exposure across distributed systems.
Multi-Domain (SAN) Certificates secure multiple distinct domain names or a mix of domains and subdomains that do not fit a single wildcard pattern (e.g., domain1.com, domain2.net, sub.domain3.org). They are ideal for organizations managing diverse web properties under a single certificate.
Self-Signed Certificates are generated and signed by the server itself, rather than by a trusted CA. While they provide encryption, they inherently lack third-party verification. Consequently, they trigger severe browser warnings like “Your connection is not private” on public-facing sites due to the absence of a trusted CA signature. Their use is limited to testing, development environments, or secure internal networks where explicit trust can be manually managed.
Here’s how the six types stack up side by side:
| Certificate Type | Validation Level | Domain Coverage | Typical Use Case |
|---|---|---|---|
| DV (Domain Validated) | Domain control only (DNS or email) | Single domain | Blogs, internal tools, non-commercial sites |
| OV (Organization Validated) | Domain control + verified legal identity | Single domain | Business sites, e-commerce, intranets |
| EV (Extended Validation) | Rigorous legal, operational & physical vetting | Single domain | Financial institutions, large enterprises |
| Wildcard | Matches its base certificate’s DV/OV level | One domain + all its direct subdomains | Sites with many subdomains sharing one team |
| Multi-Domain (SAN) | Matches its base certificate’s DV/OV/EV level | Multiple distinct domains/subdomains | Organizations running several separate properties |
| Self-Signed | None (no third-party CA) | Single domain, manually trusted | Local development, internal/lab environments only |
Generating Your Certificate Signing Request (CSR) and Private Key
Acquiring a certificate from a CA necessitates generating a cryptographic key pair: a private key and a public key. The private key is critically sensitive and must remain secret on your server. The CSR is a text-based request containing your public key and identity information, which is submitted to the CA.
-
For Linux Users (using OpenSSL):
-
Generate Private Key:
-
RSA 2048-bit:
openssl genrsa -out your_domain.key 2048
-
ECC (e.g., secp384r1):
openssl ecparam -genkey -name secp384r1 -noout -out your_domain.key
-
RSA 2048-bit:
- openssl req -new -key your_domain.key -out your_domain.csr
- Key Fields: Provide accurate details for Common Name (FQDN) (e.g., www.example.com or *.example.com), Organization, Locality, State, and Country.
-
Generate Private Key:
-
For Windows Users (Using IIS Manager or Certreq):
-
Using IIS Manager:
IIS Manager provides a wizard-driven interface for CSR generation.
- Steps: Navigate to IIS Manager → Server Certificates → Create Certificate Request…
- Inputs: Enter required Distinguished Name Properties (Common Name, Organization, etc.) and select cryptographic options (e.g., RSA, 2048-bit key length).
- Output: IIS creates the CSR file and manages the associated private key internally, awaiting certificate import.
-
Using certreq (Command-Line): For administrators
preferring command-line tools or automation, certreq is a powerful
native Windows utility.
- Preparation: Create an INF file (e.g., request.inf) specifying certificate request details.
-
[Version]
Signature=”$Windows NT$”
[NewRequest]
Subject = “CN=www.yourdomain.com, O=Your Organization, L=Your City, S=Your State, C=US”
KeySpec = 1
KeyLength = 2048
Exportable = TRUE
MachineKeySet = TRUE
SMIME = FALSE
PrivateKeyArchive = FALSE
UserProtected = FALSE
UseExistingKeySet = FALSE
ProviderName = “Microsoft RSA SChannel Cryptographic Provider”
ProviderType = 12
RequestType = PKCS10
KeyUsage = 0xa0 ; Digital Signature + Key Encipherment
HashAlgorithm = SHA256
[Extensions]
2.5.29.17 = “{text}”
_continue_ = “dns=www.yourdomain.com&”
_continue_ = “dns=yourdomain.com” -
Generate CSR: Open an elevated Command Prompt or
PowerShell and run:
certreq -new request.inf your_domain.csr
- Output: This command generates the private key within the Windows certificate store (accessible via certmgr.msc) and creates your_domain.csr file, ready for submission to your CA.
-
Using IIS Manager:
Implementing SSL/TLS on Your Web Servers: Linux and Windows
With your SSL/TLS certificate acquired and its private key secured, the next critical phase involves correctly installing and configuring it on your web server. This process is highly platform-dependent, requiring specific configurations for Linux-based servers (Apache, Nginx) and Windows Server (IIS). The overarching goal is to securely bind your certificate to your website, enabling and enforcing HTTPS traffic.
Setting Up SSL/TLS on Linux Web Servers
Linux web servers, particularly Apache HTTP Server and Nginx, are widely used and offer robust, command-line driven SSL/TLS configuration capabilities.
-
Apache HTTP Server:
- Prerequisites: Ensure the mod_ssl module is enabled in your Apache installation. On Debian/Ubuntu, use sudo a2enmod ssl; on RedHat/CentOS, verify its loading in httpd.conf or equivalent configuration.
-
Key Configuration Directives: SSL/TLS settings are
typically defined within a <VirtualHost *:443> block in your
site’s SSL configuration file.
- SSLEngine On: Activates the SSL/TLS engine for this Virtual Host.
- SSLCertificateFile /path/to/your_domain.crt: Specifies the absolute path to your primary domain certificate file.
- SSLCertificateKeyFile /path/to/your_private.key: Points to the corresponding private key file. Crucially, this file must have restrictive permissions (e.g., chmod 400) to prevent unauthorized access.
- SSLCertificateChainFile /path/to/intermediate_chain.crt: (or SSLCACertificateFile for older versions) Essential for providing the full chain of trust. This file, often a “CA Bundle,” contains one or more intermediate certificates issued by your CA, enabling browsers to validate the certificate back to a trusted root.
-
Common File Locations and Server Restart Commands:
- Debian/Ubuntu: Certificates in /etc/ssl/certs/, private keys in /etc/ssl/private/. SSL Virtual Host configurations often reside in /etc/apache2/sites-available/your_domain_ssl.conf and are enabled with sudo a2ensite your_domain_ssl.conf.
- RedHat/CentOS: Certificates in /etc/pki/tls/certs/, keys in /etc/pki/tls/private/. SSL configurations might be in /etc/httpd/conf.d/ssl.conf or site-specific files.
- After changes, always test configuration syntax: sudo apachectl configtest (or apache2ctl). If successful, restart Apache: sudo systemctl restart apache2 (Debian/Ubuntu) or sudo systemctl restart httpd (RedHat/CentOS).
-
Nginx:
- Nginx is renowned for its performance and clean configuration. SSL/TLS directives are typically placed directly within the server block designated for HTTPS traffic.
-
Key Configuration Directives within the server block:
- listen 443 ssl: Configures Nginx to listen on standard HTTPS port 443 and enable SSL/TLS for this block.
- ssl_certificate /path/to/your_domain_bundle.crt: Specifies the path to your server certificate file. Nginx prefers a single file containing your domain’s certificate concatenated with the full intermediate certificate chain (the order is crucial: domain cert first, then intermediate(s), then root if provided).
- ssl_certificate_key /path/to/your_private.key: Points to your corresponding private key file. Ensure very restrictive permissions are set for this file.
-
Testing Configuration and Reloading Nginx:
-
After modifying Nginx configuration files (e.g., in
/etc/nginx/sites-available/), always test for syntax errors:
sudo nginx -t
-
If the test passes, apply changes without dropping active connections by reloading Nginx:
sudo systemctl reload nginx
For a full restart (if needed):
sudo systemctl restart nginx
-
After modifying Nginx configuration files (e.g., in
/etc/nginx/sites-available/), always test for syntax errors:
Setting Up SSL/TLS on Windows Server (IIS)
Microsoft’s Internet Information Services (IIS) provides a graphical, wizard-driven environment for managing and implementing SSL/TLS certificates.
Scenario 1 (CSR Created in IIS)
-
Importing the Issued Certificate into IIS Manager:
- Once you receive your signed certificate from the CA, you’ll import it into IIS.
- Open IIS Manager.
- Select the server name in the “Connections” pane.
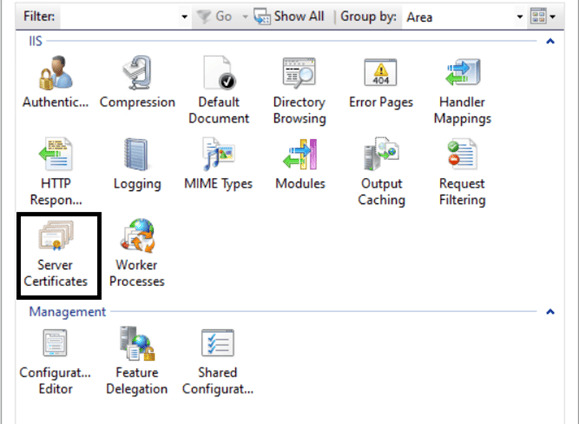
-
In the central “IIS” section, double-click “Server
Certificates.”
-
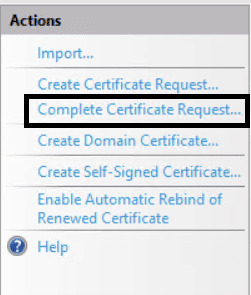
In the “Actions” pane, click “Complete Certificate
Request…”
-
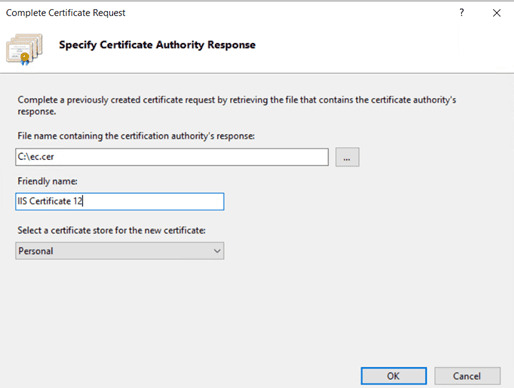
Browse to your certificate file and provide a friendly name for easy
identification within IIS. This step automatically pairs the received
certificate with the private key that was generated internally by IIS
during the CSR creation.
-
Binding the Certificate to Your Specific Website within IIS:
After importing the certificate, it must be bound to the website requiring HTTPS:
- Open IIS Manager.
- Expand “Sites”, then select your target website.
- In the “Actions” pane, click “Bindings…”.
- In the Site Bindings dialog:
-
If no HTTPS binding exists:
- Click “Add…”.
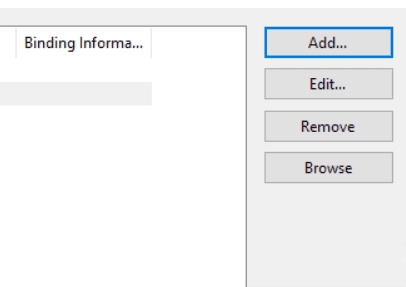
- Set Type to https.
- Choose an IP address (or leave as “All Unassigned”).
- Set Port to 443.
- Select the imported certificate from the dropdown.
-
Enable “Require Server Name Indication (SNI)” and the
hostname, if needed. With SNI, multiple websites can run on a
single IP and port, each using its own SSL certificate.
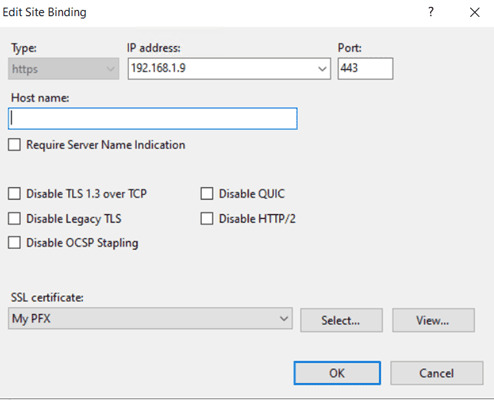
- Click “OK”.
- Click “Add…”.
-
If an HTTPS binding already exists:
- Select the existing HTTPS binding and click “Edit…”.
- Choose the new certificate from the dropdown.
- Ensure Port is 443 and update SNI setting if required.
- Click “OK”.
- Click “Close” to apply.
Your site is now configured to use HTTPS.
Scenario 2 (CSR and Key Created Externally)
If your certificate and private key were generated outside of IIS:
-
Create a .pfx (PKCS#12) File Using OpenSSL:
openssl pkcs12 -export -out combined.pfx -inkey yoursite.key -in ServerCertificate.crt -certfile ChainBundle.crt
You’ll be prompted to create a password. Remember it, since it is needed for import.
-
Importing the .pfx File:
- Open IIS Manager and go to Server Certificates as before.
- Click Import… in the Actions pane.
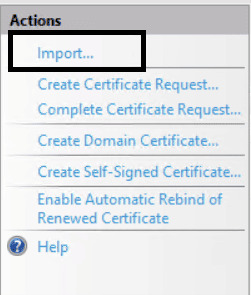
- Browse to the .pfx file, enter the password, and optionally:
- Change the Certificate Store from Personal to Web Hosting (recommended if using many certs).
-
Uncheck “Allow this certificate to be exported” if needed.
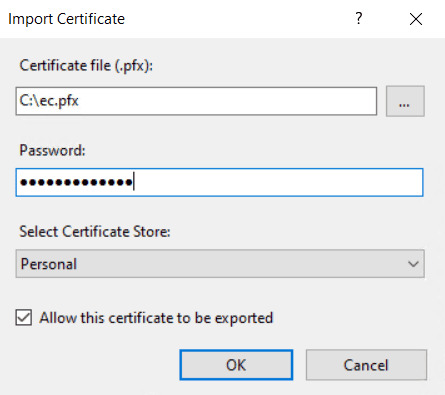
- Click OK. The certificate will appear in the list.
-
Bind as in Scenario 1:
Repeat the same binding steps from above to enable HTTPS.
Managing Certificate Lifecycles: A Step-by-Step Renewal and Automation Workflow
Effective certificate management is vital to prevent outages and maintain continuous security, especially given the finite validity periods covered above.
Those periods are shrinking on a fixed, published schedule. The CA/Browser Forum’s Ballot SC-081v3 caps new publicly trusted TLS certificates at 200 days as of March 15, 2026, dropping to 100 days on March 15, 2027, and to 47 days on March 15, 2029. Domain-validation reuse is being compressed on the same timeline. Teams still renewing certificates by hand on an annual cadence are already past the point where that process holds up.
Prerequisites Before You Begin
Before renewing or automating a certificate, confirm the following are in place. Skipping any one of these is the most common reason a renewal stalls midway.
- CA account or ACME/SCEP/EST credentials: issuance access set up ahead of the current certificate’s expiry, not requested on the day it lapses.
- DNS or HTTP validation access: the ability to complete domain control validation, either through DNS API access or a reserved HTTP-01 challenge path.
- A private key generation policy: a decision on RSA-2048 versus ECC, matched to what your CA and target servers support.
- A complete certificate inventory: including certificates issued outside your official channels, which a Certificate Transparency log query will usually surface.
- A deployment target list: every server, load balancer, and CDN edge that needs the certificate installed.
- A rollback plan: the prior certificate and key kept available until the new one is verified live in production.
Step-by-Step Certificate Renewal and Automation Workflow
This is the same sequence whether you are renewing one certificate by hand or configuring a certificate lifecycle management (CLM) platform to do it automatically.
- Inventory every certificate you are responsible for, including any issued outside your CLM. A Certificate Transparency log query against your domains will catch shadow certificates a spreadsheet misses.
- Generate or reuse a CSR and private key for the domain, matching the key type and size your CA currently supports.
- Submit the CSR to your CA through its API or an ACME, SCEP, or EST client, rather than a manual web portal, whenever automation is available.
- Complete domain control validation using the DNS-01 or HTTP-01 method. Note that DCV reuse windows are shrinking on the same SC-081v3 schedule as certificate validity itself.
- Deploy the issued certificate to every server, load balancer, or CDN edge that needs it, using a renewal agent where one is available.
- Reload, rather than fully restart, the web server or service so it picks up the new certificate without dropping active connections.
- Verify the live certificate with an online checker or
openssl s_client, confirming the chain, validity dates, and Common Name match what you expect. - Update your certificate inventory and confirm your monitoring reflects the new expiration date before closing out the renewal.
Prerequisite-to-Action Table
| Prerequisite | Why It Matters | Action to Take |
|---|---|---|
| CA account or API access | Required to automate issuance instead of a manual portal request | Set up ACME, SCEP, or EST credentials before the current certificate nears expiry |
| DNS or HTTP validation access | Required to complete domain control validation | Delegate DNS API access, or reserve the HTTP-01 challenge path on the target server |
| Private key policy | Determines key type, size, and rotation behavior | Decide RSA-2048 versus ECC ahead of generation, based on what your CA supports |
| Full certificate inventory | Prevents shadow certificates from going unmanaged | Run a Certificate Transparency log query against every domain you own |
| Deployment target list | Ensures no server or edge is missed during rollout | Map every server, load balancer, and CDN edge that uses the certificate |
| Rollback plan | Limits the blast radius of a bad renewal | Keep the prior certificate and key available until the new one is verified live |
Before and After: Manual vs. Automated Renewal Workflow
| Step | Manual Process | Automated Process (ACME/CLM) |
|---|---|---|
| Tracking expiration | Spreadsheet or calendar reminder, often incomplete | Continuous inventory with days-remaining alerting |
| Requesting the certificate | Manual CA portal login and form submission | Automated API or ACME/SCEP/EST call, no human step |
| Domain validation | Manual DNS record or file upload per renewal | Automated DNS API integration, repeated on schedule |
| Deployment | Manual file copy and server restart per host | Renewal agent pushes and reloads across all targets |
| Verification | Manual browser or openssl check, if remembered | Automated post-deployment verification and logging |
| Time per certificate | 30 to 90 minutes, more with multiple servers | Minutes, largely unattended |
| Typical failure mode | Missed renewal date, silent outage | Alert fires well before expiry if automation stalls |
Rollback Guidance
Every renewal, automated or manual, should have a defined way back. Keep the prior certificate and its private key available and unrevoked until the new certificate has been verified live in production, not just installed. Document how to revert a binding quickly in IIS, Apache, or Nginx, since that is not something you want to look up for the first time during an incident. Test new certificate deployments in staging before pushing to production wherever your pipeline allows it, and keep the rollback window long enough to catch delayed failures, such as a client library that caches the old certificate chain.
Common Renewal Errors and How to Avoid Them
- Missed renewal from an expired DCV reuse window: re-validate domain control on the CA’s current reuse schedule instead of assuming last quarter’s validation still counts.
- Mismatched private key after CSR regeneration: confirm the deployed certificate corresponds to the private key actually installed on the server, not an older one.
- Incomplete chain after the CA reissues with a new intermediate: pull the current CA bundle at renewal time rather than reusing a cached chain file.
- Renewal agent losing connectivity to the CLM platform: alert on agent heartbeat failures separately from certificate expiry alerts.
- Forgetting to update the SAN list when a subdomain is added: treat SAN changes as a trigger for immediate reissuance, not the next scheduled renewal.
Success Metrics to Track
Once automation is in place, these are the numbers that show whether it is actually reducing outage risk rather than just adding another dashboard.
- Percentage of certificates under automated management versus tracked manually.
- Average number of days before expiry that renewal actually completes.
- Number of certificate-related incidents or outages per quarter.
- Mean time to renew, from CSR generation to verified deployment.
- Reduction in manual renewal tickets filed to the platform or PKI team.
On that last point, Encryption Consulting’s own ROI modeling for CertSecure Manager estimates an average 25% reduction in certificate lifecycle management effort once automation replaces manual renewal, which in a representative mid-size enterprise environment works out to roughly $887,080 in annual savings (Encryption Consulting ROI calculator, accessed August 2026). Actual results vary by certificate volume and current process maturity, so treat it as a planning benchmark rather than a guarantee.
TLS Certificate Automation Benefits
Automating certificate lifecycles reduces operational overhead and strengthens security at the same time. The main benefits worth budgeting for:
- Reduced manual effort: automated tools handle key generation, CSR submission, validation, and certificate installation or renewal without a person repeating the same steps each cycle.
- Improved security: eliminates the human error behind most outages, including forgotten renewals and misconfigurations, keeping connections continuously secure.
- Cost savings: free CAs like Let’s Encrypt, paired with automation, can eliminate DV certificate purchase costs while reducing the risk and expense of outages caused by expired certificates.
- Operational efficiency: guarantees uninterrupted HTTPS service through renewals that happen on schedule rather than on someone’s memory.
Enforcing HTTPS: Crucial Redirection Strategies
Even with a certificate installed, users might still try to access your site via HTTP. It is imperative to redirect all HTTP traffic to HTTPS to prevent “mixed content” warnings, optimize SEO, and ensure all user interactions are secured. This involves configuring permanent (301) redirects on your web server.
-
Apache:
-
Using .htaccess files: For simple redirects or per-directory rules
(requires AllowOverride All for AuthConfig in httpd.conf).
RewriteEngine On
RewriteCond %{HTTPS} off
RewriteRule ^(.*)$ https://%{HTTP_HOST}%{REQUEST_URI} [L,R=301] -
Using VirtualHost Configurations (recommended for performance and cleaner configuration):
Define a separate VirtualHost block for Port 80 to handle redirects.
<VirtualHost *:80>
ServerName your_domain.com
ServerAlias www.your_domain.com
Redirect 301 / https://your_domain.com/ # Or use RewriteRule for more flexibility
</VirtualHost>For a more dynamic redirect:
<VirtualHost *:80>
ServerName your_domain.com
ServerAlias www.your_domain.com
RewriteEngine On
RewriteRule ^(.*)$ https://%{HTTP_HOST}%{REQUEST_URI} [L,R=301,NE]
</VirtualHost>
-
Using .htaccess files: For simple redirects or per-directory rules
(requires AllowOverride All for AuthConfig in httpd.conf).
-
Nginx:
Nginx redirection is highly efficient and typically implemented within a dedicated server block for HTTP traffic.
server {
listen 80;
server_name your_domain.com www.your_domain.com;
return 301 https://$host$request_uri; # Redirects all HTTP requests to HTTPS
}This simple block listens on Port 80 and issues a permanent redirect to the HTTPS version of the exact same request URI.
-
IIS:
-
Utilizing the URL Rewrite Module: The recommended and most robust method for IIS is to install and configure the URL Rewrite Module.
- Ensure the URL Rewrite Module is installed (download from Microsoft or via Web Platform Installer).
- In IIS Manager, select your website.
- Double-click “URL Rewrite.”
- Click “Add Rule(s)…” in the “Actions” pane and choose “Blank Rule.”
-
Configure the rule:
- Name: HTTP to HTTPS Redirect
- Match URL: Requested URL: Matches the Pattern, Using: Regular Expressions, Pattern: (.*)
- Conditions: Logical grouping: Match All. Add a condition: Input: {HTTPS}, Type: Matches the Pattern, Pattern: off
- Action: Action type: Redirect, Redirect URL: https://{HTTP_HOST}/{R:1}, Redirect type: Permanent (301)
- Apply the changes. This ensures all HTTP requests are permanently redirected to their HTTPS counterparts, providing a seamless and secure user experience.
-
Utilizing the URL Rewrite Module: The recommended and most robust method for IIS is to install and configure the URL Rewrite Module.
Advanced Security & Troubleshooting for SSL/TLS
Even with meticulous installation, SSL/TLS configurations can present challenges. This section provides insights into diagnosing common issues and strategies for proactively enhancing your server’s security posture to combat evolving threats.
Troubleshooting Common SSL/TLS Issues
Effective diagnosis of SSL/TLS problems requires understanding common symptoms and employing targeted solutions.
-
Browser Warnings and Their Solutions
These are often the first, and most alarming, indicators of a problem for end-users.
-
“Your connection is not private” / “NET::ERR_CERT_DATE_INVALID” /
“NET::ERR_CERT_COMMON_NAME_INVALID”: These generic warnings often stem
from:
-
Expired Certificate: The certificate’s validity
dates have passed.
Solution: Renew and install the new certificate immediately. -
Common Name (CN) Mismatch: The domain in the
certificate doesn’t match the accessed URL (e.g., a certificate for
example.com accessed via www.example.com without SANs).
Solution: Obtain a certificate covering all necessary domain variations (e.g., using Subject Alternative Names – SANs). -
Untrusted Certificate Chain: The browser cannot
verify the trust path back to a trusted root CA, usually because
intermediate certificates are missing or incorrectly installed on
the server.
Solution: Install the full certificate chain/CA bundle provided by your CA. -
Self-Signed Certificate: For public-facing sites,
browsers inherently distrust self-signed certificates.
Solution: Obtain a certificate from a globally trusted CA.
-
Expired Certificate: The certificate’s validity
dates have passed.
-
“Mixed Content” Warnings:
Occur when an HTTPS page loads some resources (images, scripts, CSS)
over insecure HTTP. Browsers display a warning because the connection
isn’t entirely secure.
- Identify: Use browser developer tools (Console tab) to pinpoint insecure HTTP URLs.
-
Update: Change all identified
http://URLs tohttps://in your website’s code, database, or themes. - Enforce: Implement a Content Security Policy (CSP) header to automatically block or upgrade mixed content.
-
“Your connection is not private” / “NET::ERR_CERT_DATE_INVALID” /
“NET::ERR_CERT_COMMON_NAME_INVALID”: These generic warnings often stem
from:
-
Server-Side Errors
These issues prevent the SSL/TLS connection from being established or cause server failures.
-
Private Key and Certificate Mismatch: The installed
certificate does not correspond to the private key on the server.
Solution: Ensure the correct private key, generated with the CSR, matches the installed certificate. -
Incorrect File Permissions for Certificate Files: On
Linux, overly permissive private key files (e.g., chmod 777) will be
rejected by web servers for security.
Solution: Set strict permissions, e.g.,chmod 400for private keys. -
Firewall Blocks on Port 443: If the server’s firewall
(e.g., ufw, firewalld, Windows Firewall) blocks incoming connections on
HTTPS Port 443, no secure traffic can reach the web server.
Solution: Open Port 443 in your server’s firewall configuration. -
Syntax Errors in Server Configuration: Typos or invalid
directives in Apache, Nginx, or IIS configuration files can prevent the
server from starting or loading SSL/TLS settings.
Solution: Always test configuration syntax (apachectl configtest,nginx -t) before restarting services.
-
Private Key and Certificate Mismatch: The installed
certificate does not correspond to the private key on the server.
-
Essential Diagnostic Tools
When troubleshooting, these tools are invaluable for rapid problem identification.
- Online SSL Checkers: External tools that perform a comprehensive scan of your server’s SSL/TLS configuration from the internet, reporting on certificate chain validity, supported protocols/cipher suites, and known vulnerabilities, often providing an overall grade.
-
openssl s_client (Linux Command-Line): A powerful
utility for connecting to an SSL/TLS server to inspect raw certificate
details, cipher negotiation, and the full certificate chain
presented.
Example:openssl s_client -connect yourdomain.com:443 -showcerts
- Browser Developer Tools (Security/Console Tabs): Built into your web browser, the “Security” tab offers a quick overview of the certificate and connection details, while the “Console” tab is crucial for spotting mixed content warnings and client-side errors.
Enhancing Your SSL/TLS Security Posture
Proactively strengthening your SSL/TLS configuration is essential to maintain robust security against evolving threats and ensure compliance with modern best practices.
How to Disable SSL 2.0, SSL 3.0, and TLS 1.0 (and TLS 1.1)
Why Disable? These older protocols contain critical known vulnerabilities (e.g., POODLE for SSL 3.0, BEAST for TLS 1.0/1.1) that can lead to data decryption. Modern best practices mandate disabling them, using only TLS 1.2 or TLS 1.3.
-
Apache: In your SSL VirtualHost or global configuration
file (typically httpd.conf or ssl.conf), set the following directive to
explicitly disable insecure protocols:
SSLProtocol all -SSLv2 -SSLv3 -TLSv1 -TLSv1.1
This enables only TLS 1.2 and TLS 1.3 (if supported).
Alternative: You can also use SSLProtocol TLSv1.2 TLSv1.3 for more explicit control. -
Nginx: In your server or http block, use ssl_protocols
TLSv1.2 TLSv1.3;.
-
IIS:
To disable outdated SSL versions on Windows, you can either use a
graphical tool such as IIS Crypto or make the changes manually via the
Windows Registry. To do it manually, follow these steps:
- Open the Registry Editor by pressing Win + R, typing regedit, and pressing Enter.
-
Navigate to the following registry path:
HKEY_LOCAL_MACHINE\SYSTEM\CurrentControlSet\Control\SecurityProviders\SCHANNEL\Protocols
- If the SSL 2.0 folder doesn’t exist, create it by right-clicking Protocols > New > Key, and name it SSL 2.0.
- Inside the SSL 2.0 folder, create a new key named Server.
- Within the Server key:
- Click Edit > New > DWORD (32-bit) Value.
- Name it Enabled, press Enter.
- Set its value to 0 (right-click > Modify > enter 0) to disable the protocol.
- Repeat the same process for other protocols.
- After making these changes, restart your computer for them to take effect.
- Ensure your clients (browsers, applications) support TLS 1.2 or above before enforcing these changes.
- Consider testing configuration changes in a staging environment before applying them to production.
- Some older clients may not support TLS 1.2 by default and might require updates or configuration changes.
Starting with KB4490481, Windows Server 2019 introduced a feature called “Disable Legacy TLS” that provides granular control over TLS versions used with specific certificates. This allows administrators to enforce a minimum TLS version and cipher suite for designated certificates, effectively blocking weaker TLS versions. Furthermore, “Disable Legacy TLS” enables a single online service to offer two types of endpoints on the same hardware simultaneously: one exclusively for TLS 1.2+ traffic and another for older TLS 1.0 traffic, catering to diverse client needs while maintaining security standards.
This carries forward on Windows Server 2022 and Windows Server 2025, both of which also support TLS 1.3 natively at the OS/Schannel level (Windows Server 2016 and 2019 do not). If you’re managing the registry keys across more than a handful of machines, Nartac Software’s free IIS Crypto tool applies the same Microsoft-recommended settings through a GUI and currently supports Windows Server 2012 through 2025, which is faster and less error-prone than editing SCHANNEL keys by hand on every box.
Note:
Implementing HTTP Strict Transport Security (HSTS) to Force HTTPS-Only Connections
- HSTS is a security policy that instructs browsers to only access your domain via HTTPS, even if a user attempts to use http:// or clicks an HTTP link. This prevents protocol downgrade attacks and enhances security.
-
Implementation: Send the Strict-Transport-Security HTTP
response header.
- Apache: Header always set Strict-Transport-Security “max-age=31536000; includeSubDomains; preload” (within SSL VirtualHost).
- Nginx: add_header Strict-Transport-Security “max-age=31536000; includeSubDomains; preload”; (within HTTPS server block).
-
IIS:
- Go to HTTP Response Headers for your site in IIS Manager.
- Add a new header:
- Name: Strict-Transport-Security
- Value: max-age=31536000; includeSubDomains; preload
- Alternatively, use the URL Rewrite module to add the header conditionally for HTTPS requests.
- max-age=31536000 sets the policy duration to 1 year.
- includeSubDomains applies the policy to all subdomains.
- Preload allows your domain to be included in browsers’ HSTS preload lists (requires submission to Chrome’s HSTS preload list).
Note:
Prioritizing Strong Cipher Suites and Ensuring Perfect Forward Secrecy (PFS)
- Configure your server to prefer strong, modern cipher suites (e.g., those using AES-256 GCM, ChaCha20-Poly1305) and disable weaker ones.
- PFS: Crucially, prioritize cipher suites that implement PFS (e.g., those beginning with ECDHE or DHE). PFS ensures that even if your server’s long-term private key is compromised in the future, past encrypted sessions cannot be decrypted.
Best Practices for Secure Private Key Management
- Your private key is the ultimate secret. Its compromise nullifies the entire SSL/TLS security.
- Strict Permissions: Set extremely restrictive file permissions (e.g., chmod 400 on Linux) so only the web server process can read it.
- Secure Storage: Store keys only on the server, in non-web-accessible directories. Never transmit them via insecure channels (e.g., email).
- Password Protection: Encrypt private keys with a strong passphrase for an added layer of protection, even if it requires manual entry on server restart.
Multi-Cloud and Hybrid PKI Certificate Management
Most enterprises are not managing certificates in a single environment anymore. A typical estate spans an internal Microsoft PKI for domain-joined servers, cloud-native certificate services for AWS, Azure, or Google Cloud workloads, and public certificates from two or three different Certificate Authorities for customer-facing sites. Each environment tends to have its own tooling, its own renewal cadence, and its own blind spots.
Certificate Discovery Across Environments
The first step in any multi-cloud or hybrid environment is finding out what actually exists. A Certificate Transparency log query against your domains, combined with network scanning and static code analysis, will surface certificates issued outside official channels, sometimes called shadow certificates, that no single cloud console or on-premises tool will show you on its own. This kind of continuous certificate discovery is the foundation everything else in this section depends on.
Crypto Agility as the Underlying Requirement
Hybrid and multi-cloud estates rarely standardize on one algorithm or key type across every environment, which makes crypto agility a practical requirement rather than a future consideration. The ability to swap algorithms or key sizes across every environment without a manual, per-system rebuild is what lets an organization respond to a CA/Browser Forum policy change, a newly disclosed vulnerability, or a post-quantum migration deadline without a multi-quarter scramble.
Handling Multi-Cloud Certificate Automation
Standardize on ACME, SCEP, or EST wherever the issuing CA supports it, regardless of which cloud or on-premises environment a given certificate serves. A vendor-neutral certificate automation platform that talks to multiple CAs and deployment targets gives PKI and platform teams one place to see renewal status, instead of reconciling separate views from each cloud provider’s native certificate manager and an internal Microsoft PKI console.
Owner and Action Matrix: What Each Team Should Do Next
Certificate lifecycle work fails most often at handoffs between teams, not within any single team’s part of the job. The table below assigns a concrete next action to each group.
| Team | Immediate Action | Owner Deliverable |
|---|---|---|
| PKI Team | Inventory every Certificate Authority and certificate template currently in use | A documented Certificate Authority map |
| Security Team | Confirm TLS 1.2/1.3 only and HSTS enforced on every public endpoint | A protocol and cipher suite baseline |
| Platform Team | Deploy renewal agents or ACME clients to every server and load balancer | An automated renewal coverage report |
| Compliance Team | Map the certificate inventory to DORA, PCI DSS 4.0, or other applicable requirements | An audit-ready certificate register |
- PKI team, what to do next: confirm ownership of every internal and public Certificate Authority, and flag any certificate template still issuing keys shorter than 2048-bit RSA or without a defined rotation policy.
- Security team, what to do next: run an online SSL/TLS checker against every public-facing domain and close any gap where SSL or TLS 1.0/1.1 is still accepted.
- Platform team, what to do next: pick one non-critical service to pilot ACME or renewal-agent automation before rolling it out estate-wide.
- Compliance team, what to do next: confirm the certificate register can be produced on demand for an audit, rather than assembled manually each cycle.
Our Take: What We’d Actually Recommend
Most of the checklist above is table stakes; any competent admin can disable TLS 1.0 and set an HSTS header. The part teams consistently underestimate is what happens once certificate lifetimes hit 100 days in 2027 and 47 days in 2029. A 47-day certificate renews roughly eight times a year, per host. If your inventory runs into the hundreds, that’s thousands of renewal events annually, and a single missed one is a public outage, not a warning banner. We’d rather see teams build the automation now, while the cap is still 200 days and there’s room to test the pipeline, than retrofit it under pressure once 47-day renewals are the norm. That means: a real-time inventory of every certificate you’re responsible for (including the ones nobody remembers issuing), ACME or an equivalent automated issuance path wired into your CI/CD and server config management, and alerting that fires on days remaining, not just on expiry. Manual tracking in a spreadsheet, which is still how a surprising number of organizations manage this today, does not survive contact with a 47-day renewal cadence.
How Can Encryption Consulting Help?
At Encryption Consulting, we help organizations secure and streamline their digital infrastructure through our Certificate Lifecycle Management (CLM) solution, CertSecure Manager. Designed for modern enterprises, CertSecure Manager offers a comprehensive, automated approach to managing digital certificates across diverse environments.
CertSecure Manager provides centralized control over the entire certificate lifecycle, from issuance and deployment to renewal and revocation, across platforms such as Apache, Nginx, and IIS. By automating these processes, it eliminates manual errors, reduces administrative overhead, and prevents service disruptions caused by expired or misconfigured certificates.
The platform includes real-time monitoring and alerting capabilities that notify administrators of expiring, misconfigured, or potentially compromised certificates. It also offers detailed, customizable reporting for compliance audits and certificate inventory tracking. These insights are accessible through an intuitive dashboard that consolidates critical metrics such as CA performance, cryptographic key strength matrices, and certificate expiration trends into a single interface. CertSecure Manager dashboard also features 12 Key Performance Indicators (KPIs) that offer a clear and concise overview of your certificate environment. These KPIs highlight the current state metrics of the active, expired, pending, and revoked certificates, as well as critical insights into high-risk certificates.
CertSecure Manager also supports the ACME (Automatic Certificate Management Environment) protocol, enabling seamless, automated certificate issuance and renewal.
Certificate management does not stop at TLS. Encryption Consulting’s PQC Center of Excellence helps teams build the crypto agility needed to prepare for 47-day TLS certificates and the broader post-quantum transition, while CBOM Secure extends that same discovery and inventory discipline to every cryptographic asset in your environment, not certificates alone. Our cryptographic bill of materials approach turns that inventory into a prioritized, audit-ready action plan rather than a static spreadsheet.
Partner with us to transform your certificate management into a seamless, secure, and compliant operation.
Conclusion
You’ve now completed a comprehensive journey, starting with the immediate observation of a padlock icon and delving deep into the intricate world of SSL/TLS certificates. We’ve explored everything from the fundamental principles of encryption and digital trust to the practicalities of generating, installing, and managing certificates across both Linux and Windows server environments, and even troubleshooting common issues that can arise. Remember, establishing secure communication isn’t a one-time task; it’s an ongoing, continuous process that demands vigilance and proactive management.
As the digital landscape rapidly evolves, with advancements like the widespread adoption of TLS 1.3 and the emerging field of quantum-resistant cryptography, the need for robust security remains paramount. Stay informed, stay proactive, and ensure your digital future is a secure one.
Frequently Asked Questions About SSL/TLS Certificates
What is the main takeaway from this guide?
The padlock icon only confirms a connection is encrypted, not that the certificate is trustworthy. Always check the Common Name, Issuer, and Validity Period directly. And with public certificate validity dropping to 100 days in 2027 and 47 days in 2029, manual tracking no longer scales; automated certificate lifecycle management has moved from convenience to operational necessity.
Why does this matter for enterprise certificate lifecycle management?
A single missed renewal on a customer-facing service is a public outage, not a warning banner. As validity periods shrink, the number of renewal events per certificate multiplies each year, so any manual gap in tracking, validation, or deployment compounds quickly across an enterprise’s full certificate inventory.
What teams are responsible for acting on this guidance?
Certificate lifecycle work touches four groups in most enterprises: the PKI team, which owns certificate authorities and templates; the security team, which sets protocol and cipher baselines; the platform team, which deploys and renews certificates on servers and load balancers; and the compliance team, which maps the inventory to regulatory requirements like DORA and PCI DSS 4.0.
What risks increase if this topic is handled manually?
Manual tracking increases the odds of a missed renewal, a mismatched private key, an incomplete certificate chain, or an undiscovered shadow certificate issued outside official channels. DigiCert’s July 2025 survey found 45% of enterprises had certificate-related downtime in the past year, with 37.5% tracing it directly to an expired certificate.
How does automation reduce certificate outage risk?
Automated certificate lifecycle management removes the human steps most likely to fail: remembering a renewal date, manually requesting and validating a new certificate, and deploying it correctly across every server. Protocols like ACME, SCEP, and EST let a CLM platform renew and deploy certificates before expiry without a person in the loop.
What metrics should teams track after implementation?
Track the percentage of certificates under automated management, average days-to-renewal before expiry, the number of certificate-related incidents per quarter, mean time to renew, and the reduction in manual renewal tickets. These metrics show whether automation coverage is actually closing the outage risk, not just adding another dashboard.
How does this connect to 47-day TLS certificate readiness?
The CA/Browser Forum’s Ballot SC-081v3 cuts the maximum public TLS certificate validity to 200 days in March 2026, 100 days in March 2027, and 47 days in March 2029. A 47-day certificate renews roughly eight times a year per host, which makes the manual renewal habits built around annual certificates operationally unworkable.
How should this be handled in multi-cloud or hybrid PKI environments?
Start with discovery: a Certificate Transparency log query plus network and code scanning to find every certificate across on-premises PKI, AWS, Azure, and Google Cloud. From there, standardize on ACME, SCEP, or EST wherever the CA supports it, and use a vendor-neutral certificate lifecycle management platform for a single view instead of managing each environment’s native tools separately.
What prerequisites are needed before implementation?
Before automating certificate lifecycle management, confirm CA API or ACME account access, DNS or HTTP validation access for domain control, a documented private key generation policy, a complete inventory of deployment targets, and a rollback plan that keeps the prior certificate and key available until the new one is verified live.
What screenshots or configuration examples should be included?
A practical rollout should document browser certificate detail screens for Chrome, Firefox, Edge, and Safari, the CA/Browser Forum validity reduction schedule, server configuration snippets for Apache, Nginx, and IIS, and CLM platform screens showing renewal agent status and certificate inventory dashboards, so operations teams can match what they see against a known-good reference.
- Key Takeaways
- Executive Summary and Quick Checklist
- The Basics of Verification: How to Check SSL/TLS Certificates
- Decoding the Digital Trust: Understanding SSL/TLS & Certificates
- Public Key Infrastructure (PKI): The Backbone of Trust
- Understanding Cipher Suites and Protocols
- Acquiring and Managing TLS Certificates: From Generation to Renewal
- Generating Your Certificate Signing Request (CSR) and Private Key
- Implementing SSL/TLS on Your Web Servers: Linux and Windows
- Managing Certificate Lifecycles: A Step-by-Step Renewal and Automation Workflow
- Enforcing HTTPS: Crucial Redirection Strategies
- Advanced Security & Troubleshooting for SSL/TLS
- Enhancing Your SSL/TLS Security Posture
- Multi-Cloud and Hybrid PKI Certificate Management
- Owner and Action Matrix: What Each Team Should Do Next
- Our Take: What We'd Actually Recommend
- How Can Encryption Consulting Help?
- Conclusion
- Frequently Asked Questions About SSL/TLS Certificates
- What is the main takeaway from this guide?
- Why does this matter for enterprise certificate lifecycle management?
- What teams are responsible for acting on this guidance?
- What risks increase if this topic is handled manually?
- How does automation reduce certificate outage risk?
- What metrics should teams track after implementation?
- How does this connect to 47-day TLS certificate readiness?
- How should this be handled in multi-cloud or hybrid PKI environments?
- What prerequisites are needed before implementation?
- What screenshots or configuration examples should be included?